Σάββατο 19 Σεπτεμβρίου 2020

Sennheiser CX 400BT review: Great-sounding mid-range wireless earbuds

Unlike a lot of headphone companies, Sennheiser has taken a more measured approach to true wireless earbuds. Thus far, it has only introduced two models, with the second being an improved version of the first. Both of those Momentum True Wireless sets were flagship units though, and they commanded a premium price ($299.95). Now Sennheiser returns with the CX 400BT: earbuds with a less flashy name, at a more affordable $199.95. And thankfully, they retain some of what made the Momentum True Wireless 2 so good. 

Design

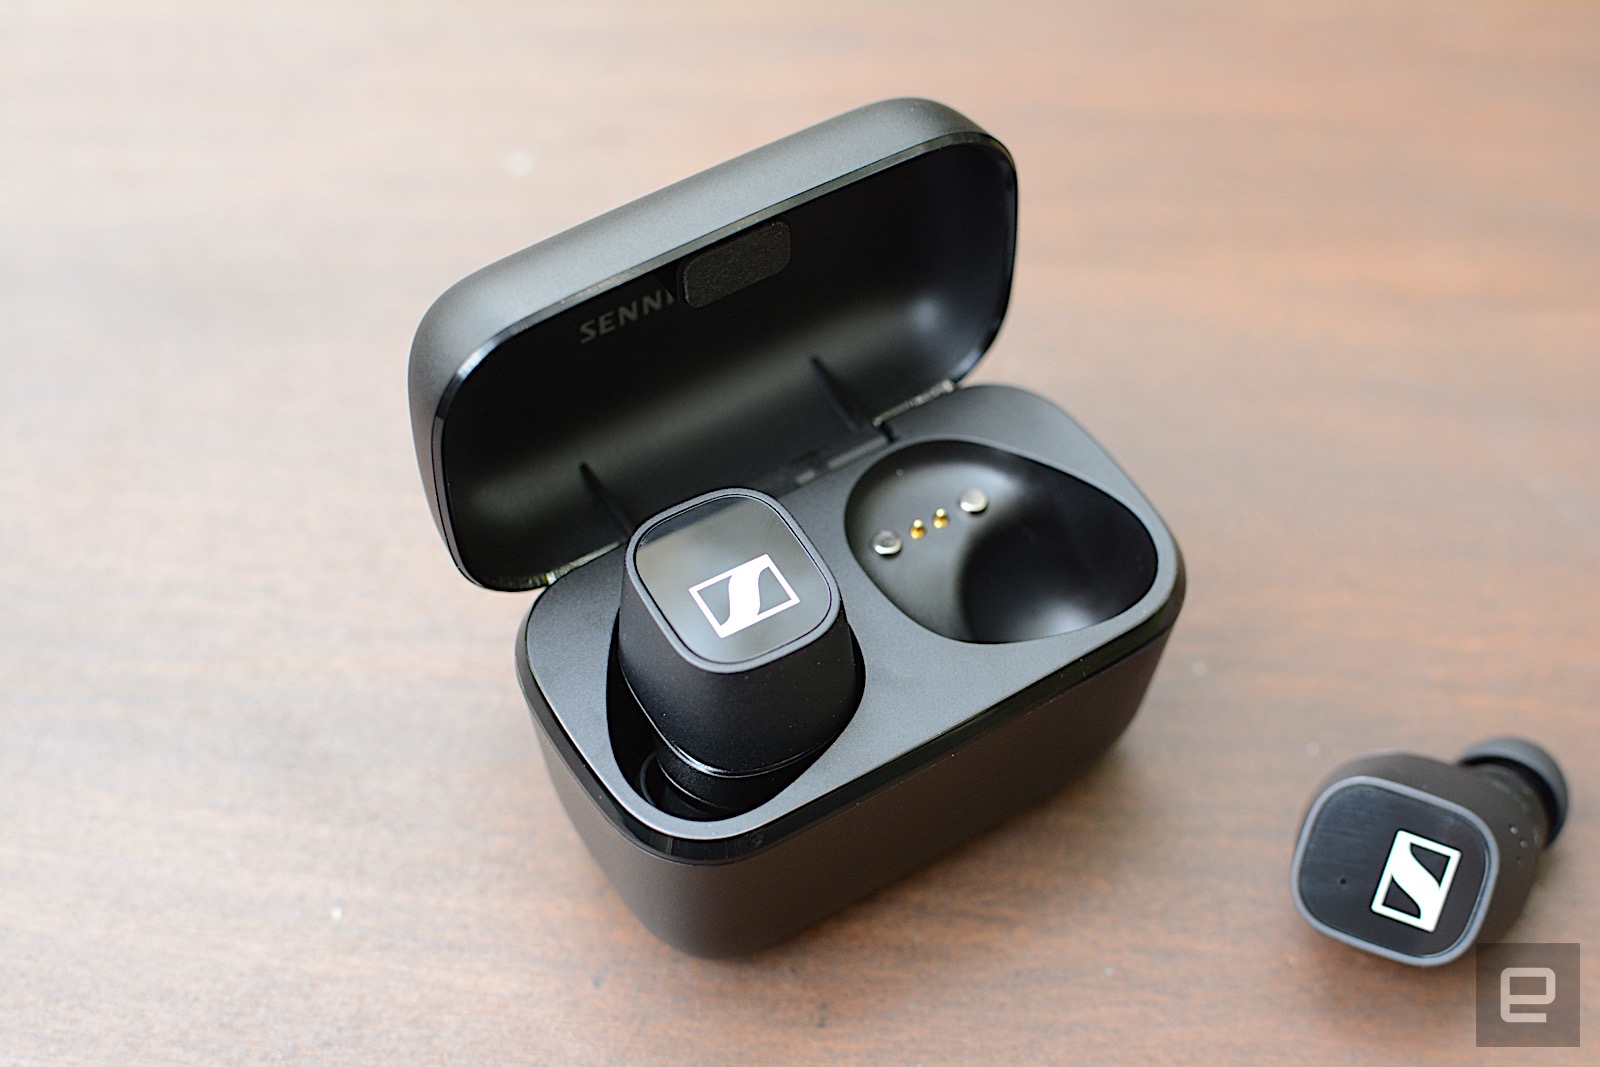
First, the CX 400BT have a different design than the Momentum True Wireless 2 (MTW 2).  Where the latter had a more circular shape to the touch panel, the former is more of a rounded rectangle. The MTW 2 also had a more premium look with its etched silver surface for the on-board controls. The CX 400BT controls are simply glossy black. Overall, both models are roughly the same size, which means this new option will still protrude out of your ears a bit. 

Sennheiser CX 400BT review
Momentum True Wireless 2 vs. the CX 400BT
Billy Steele/Engadget

The cases for the two models are vastly different. The CX 400BT's is noticeably smaller, albeit slightly taller, and lacks the tactile cloth cover from the Momentum line. The charging case with the new model feels cheaper too, especially when you notice how thin the lid is. Like previous Sennheiser models, a charging and battery indicator light is around back, next to the USB-C jack and the battery status button. 

Custom features

Sennheiser CX 400BT review

Billy Steele/Engadget

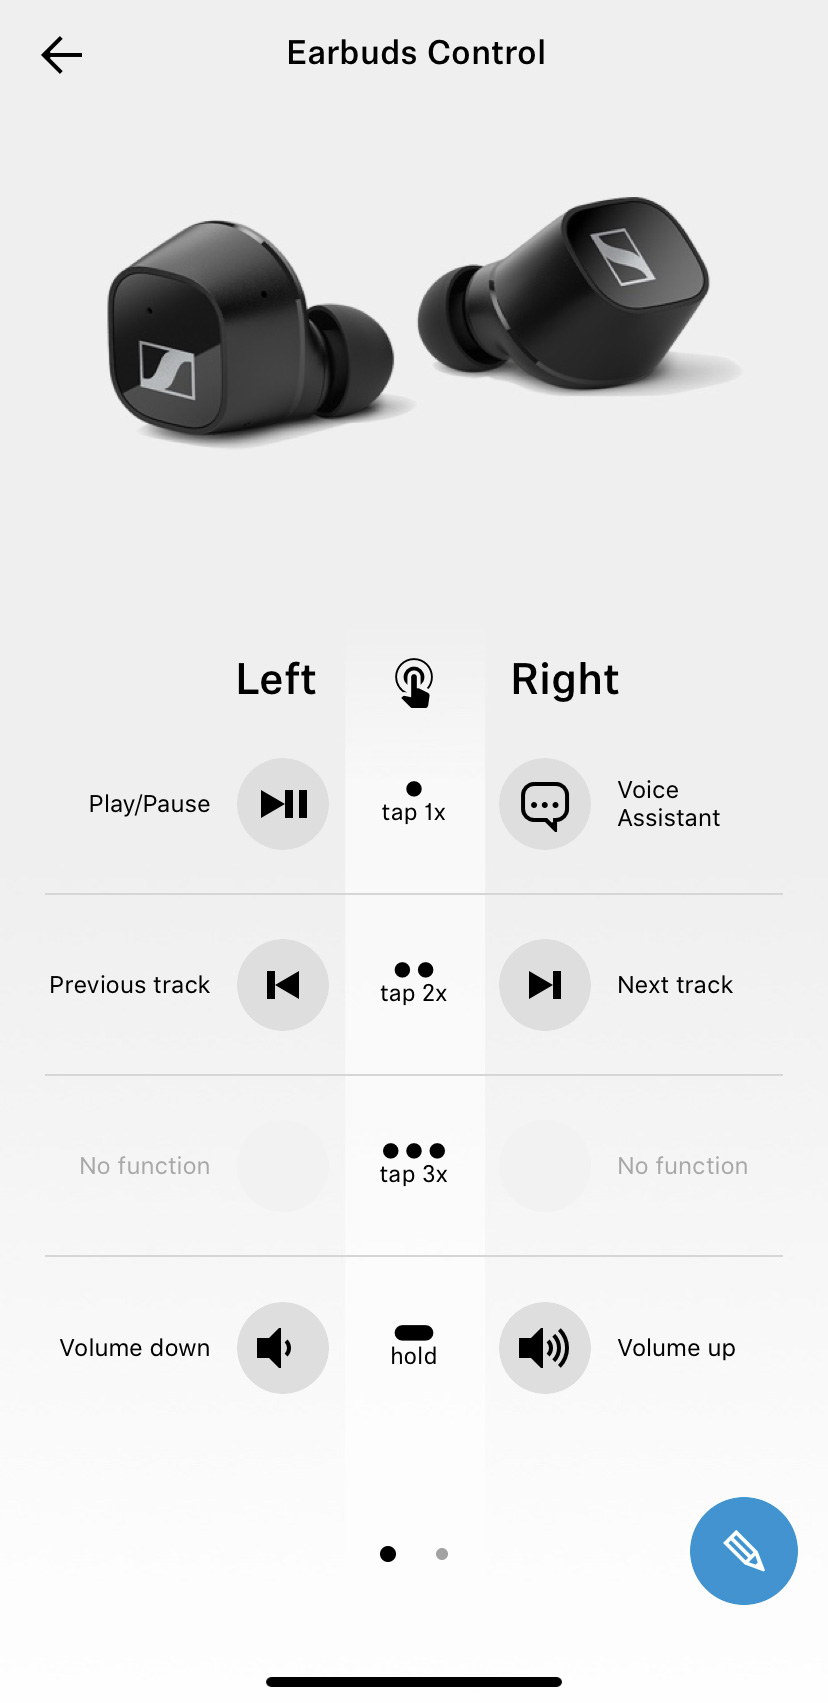
Like the MTW 2, you can customize the on-board controls for the CX 400BT inside Sennheiser's Smart Control app. Where the company differs from a lot of the competition is that it allows you to reassign almost all of the actions on both earbuds Volume controls and an optional power on/off selection are only available for press-and-hold, but single tap, double tap and triple tap are fair game for any combo of track controls and voice assistant activation you desire. On most earbuds, you can choose between a group of three functions for one particular gesture. However, Sennheiser lets you rebuild the touch controls almost from scratch if you don't like what's there by default. 

Out of the box, the triple tap is unassigned. If you wanted to leave everything else as is, you can use that action for your voice assistant. The company also offers the ability to restore the default controls with a single tap if you end up hating what you've done. What's more, you can disable the touch controls entirely if you need to. 

As is the case with other Sennheiser headphones, the Smart Control app offers custom EQ options. The abstract curve that you can swipe around to adjust the tuning is still available, but there's also a more intuitive slider option as well. Once you get a preset you like, you can name and save it in the app. Sennheiser warns that applying custom EQ profiles will impact battery life of the CX 400BT, but in my experience, the effect is minimal. 

Sound quality

Sennheiser CX 400BT review

Sennheiser says the CX 400BT has the same "acoustical system" as the Momentum True Wireless 2. That includes the 7mm "dynamic drivers" the company used in the pricier model. The sound quality is quite good on this new set of earbuds. There's outstanding clarity in the details of most genres and a deep, warm sound stage that is simply a joy to listen to. At times, the mids can get a little muddy, but overall these are a great option for anyone who is primarily concerned about audio performance. 

With PVRIS's Use Me, the CX 400BT captures the deep droning bass of the drum machines and synths in a way some earbuds I've tested can't. Sennheiser's ability to build true wireless earbuds that offer such detail is what sets it apart from the competition. That's true of the electro-rock grunge of PVRIS, the raucous bass lines of Run The Jewels and the acoustic alt country of Ruston Kelly. Across different musical styles, the CX 400BT creates clear layers of vocals and intricate instrumentation. It's like putting on your favorite hoodie -- you just want to sit and enjoy things for a while. 

One key difference between the MTW 2 and the CX 400BT is active noise cancellation (ANC). This new and more affordable model only offers passive noise isolation. That doesn't have an impact on overall audio quality, but it does make a difference when it comes to quieting distractions. Thankfully, the isolation is quite good on the CX 400BT, and I was only jerked back into reality between songs when I caught a few seconds of Puppy Dog Pals or my son's virtual elementary school lesson. The CX 400BT doesn't have an ambient sound mode either, which could be more of a dealbreaker for some than the lack of ANC.

Sennheiser CX 400BT review
Billy Steele/Engadget

Unlike a lot of the competition, Sennheiser didn't go out of its way to hype the call quality on the CX 400BT. But you can certainly use them for your phone or video chats. My wife, who I usually call to test earbuds, said these sounded slightly better than if I was on speakerphone. That's actually an improvement over some devices. She noticed background noise only cut through occasionally, but overall, the audio quality for calls was still decent at best with the CX 400BT.

It's also worth mentioning that the CX 400BT doesn't connect both buds to your device independently. The right earbud is the "master" and connects to the left. So if you want to use a single bud for a call or any other reason, it will have to be in your right ear. While this used to be the norm, independent connections are becoming the standard. Honestly, that's not a huge deal for me, but I'm right handed. I can understand why someone who's left-handed would prefer the ability to use either side. 

Battery life

Sennheiser promises seven hours of battery life on the earbuds themselves, with another 13 hours in the charging case. While companies like Audio-Technica offer over 10 hours on a single charge, I'll be honest: seven hours is plenty of time. More often than not, I dock earbuds in the case after an hour or two. Very rarely am I using something like this continuously for 4+ hours. That being said, I managed six hours and 45 minutes out of the CX 400BT before I had to tuck them away. During that time, I was making tweaks to the settings in the app and swapping connected devices. So I'd bet under "normal" use, I could easily hit the stated time figures. 

The competition

Sennheiser CX 400BT review
Billy Steele/Engadget

In the $150-$200 range, Sennheiser has a lot of competition. As true wireless earbuds have evolved, companies have been keen on packing as many features as they can into smaller and more affordable designs. One of my favorites is the Jabra Elite 75t. At $180 (currently on sale for $150), they're a vastly improved follow up to the already impressive Elite 65t. They're smaller, lighter, more comfortable and sound better than the previous model. Still no ANC, but they do have a HearThrough mode for letting ambient sound in and several customizable settings. I also really like the Galaxy Buds+ at $150 (currently on sale for $130). Samsung made sure to offer iOS users most of the same features it gave Galaxy and Android owners the first time around. These earbuds are also tiny, which makes them comfy -- especially when you wear them for longer periods of time. 

Wrap-up

In the end, I'm conflicted about the CX 400BT. On one hand, Sennheiser managed to pack the sound quality from its flagship MTW 2 in a set of earbuds that's $100 less. The only real sacrifices are in design (which doesn't make a huge difference in actual performance) and the lack of noise cancellation. On the other, the CX 400BT would be a much more attractive proposition if they were just $20 cheaper. As it stands, you've got premium sound in true wireless earbuds that are otherwise mid-range at best. Still, if sound quality is your top priority, and you aren't willing to spend big, these are certainly worth a look.


via Engadget http://www.engadget.com

How Do I Connect AirPods to a Windows PC?

Tech 911Tech 911Do you have a tech question keeping you up at night? We'd love to answer it! Email david.murphy@lifehacker.com with "Tech 911" in the subject line.

I'm going to cheat a little bit for this week's Tech 911 Q&A at Lifehacker. I didn't get this question sent in via email, as is typical, but I was asked it by a friend, since AirPods Pro are the talk of the town this week thanks to Apple's big iOS 14/iPadOS 14 update.

I'll paraphrase my friend, who basically asked a simple query that's probably on a number of peoples' minds: How the heck do I use AirPods with Windows? 

Here's the good news: It's easy. It's unconventional—or, at least, it might feel that way, since AirPods are typically easiest to configure and use within Apple's ecosystem. It is possible though, just don't tell Tim that you're trying them out on that other platform.

To get started, make sure your AirPods are hanging out in their charging case. On your Windows PC, click on the Start Menu and pull up the Settings app. Click on "Devices," and then make sure Bluetooth is enabled on your Windows desktop or laptop.

G/O Media may get a commission

Next, click on "Add Bluetooth or other device," and select "Bluetooth" in the screen that appears. While your Windows PC searches for new Bluetooth devices, grab your AirPods charging case, open it up, and hold the button on the back, below the hinge, until you see a white light start blinking. (Once you do, let go.)

Soon, you should see said AirPods pop up on the list of available devices. When they do, click on them.

They should connect almost immediately:

Click on "Done" to exit the window, and then pop your AirPods in your ears and give them a whirl. Once you're done rocking out, and assuming you want to use them with your iPad, iPhone, or Mac again, you'll need to go into that device's Bluetooth menu to reestablish the connection.

(If you have iOS 14, iPadOS 14, or macOS Big Sur and the latest AirPods Pro firmware, you'll be able to "quick switch" between your Apple devices if you're using the same Apple ID on each.)

To reconnect your AirPods with your Windows PC, pull up your Bluetooth menu in your taskbar, click on "Show Bluetooth devices," select your AirPods once again, and click on "Connect."

Any settings you enable on your AirPods via your Apple devices (such as noise cancellation, transparency mode, or spatial audio) should persist when you connect your AirPods to a Windows PC. You won't be able to change these settings, since there's no option for you to do so in Windows, so you'll have to re-connect them on your Apple device to make any adjustments.

That's it! Yes, your AirPods are cross-platform, and it's super convenient to use them with Windows if you're, well, already using them for everything Apple.


Do you have a tech question keeping you up at night? Tired of troubleshooting your Windows or Mac? Looking for advice on apps, browser extensions, or utilities to accomplish a particular task? Let us know! Tell us in the comments below or email david.murphy@lifehacker.com.


via Lifehacker https://lifehacker.com

Δευτέρα 13 Απριλίου 2020

Installing LibreOffice on the Raspberry Pi

In this guide we are going to show you how to install the LibreOffice software on a Raspberry Pi.

Raspberry Pi LibreOfficeRaspberry Pi LibreOffice

LibreOffice is a free and open-source suite of software that is designed for office use.

This software bundle comes with a wide variety of tools that help with office life. These tools range from a word processor to a spreadsheet program.

LibreOffice is widely considered to be one of the best free alternatives to Microsoft Office.

You don't have to worry about installing LibreOffice if you are running the "full" version of Raspbian. This full version comes with LibreOffice installed automatically.

The steps below will show you how to install and access the LibreOffice software package on Raspbian Desktop Lite.

Equipment List

Below is a list of the equipment that you will need to install the LibreOffice software on your Raspberry Pi.

Recommended

Raspberry Pi 1, 2, 3 or 4

Micro SD Card

Power Supply

Ethernet Cord or WiFi dongle (The Pi 3 and 4 has WiFi inbuilt)

Optional

Raspberry Pi Case

This quick and simple guide on installing LibreOffice was tested on a Raspberry Pi 4 running a clean version of Raspbian Desktop.

If you don't have Raspbian installed, you can follow our easy installation guide.

Installing LibreOffice on the Raspberry Pi

1. Installing LibreOffice on a Raspberry Pi is a fairly easy process.

Before we install LibreOffice we should first update our Raspbian installation.

We can upgrade all of the installed packages by running the following two commands within the terminal.

sudo apt update sudo apt upgrade

2. With our Raspbian installation now fully up to date we can now proceed.

To install the LibreOffice software to the Raspberry Pi all we need to do is run the command below.

sudo apt install libreoffice

Luckily for us installing the LibreOffice software package is a simple process as it is available within the Raspbian package repository.

This installation process can take some time due to the sheer size and number of packages that is needed to be installed.

The additional disk space needed after installation of the LibreOffice software package is 649mb.

Finding LibreOffice on your Raspberry Pi

With LibreOffice now installed on your Raspberry Pi, you can now find it within the Raspbian desktop interface.

The two steps below will show you where to look to find the various LibreOffice packages.

1. To find LibreOffice within Raspbian you need to click the Pi icon in the top left-hand corner.

Raspberry Pi Desktop Menu IconRaspberry Pi Desktop Menu Icon

2. Within this menu, hover over Office (1.).

Hovering over office should show you a list of the LibreOffice software that is now installed to your Raspberry Pi.

Click whichever office application that you want to open (2.).

Raspbian Desktop Menu List of LibreOffice applicationsRaspbian Desktop Menu List of LibreOffice applications

A Quick Look at LibreOffice

In this section we are going to take a quick look at three of the components that are installed as a part of the LibreOffice package.

LibreOffice Writer

Writer is the word processor that is packaged with LibreOffice.

This software is similar to Microsoft Word and will be mainly used for creating word documents. It also features support for the file formats that are used by Microsoft Office and Corel's WordPerfect software.

LibreOffice Writer Running on RaspbianLibreOffice Writer Running on Raspbian

It is possible to open the LibreOffice Writer software within the terminal by running the following command.

libreoffice --writer [FILENAME]

If you specify a filename after --writer the software will open that file.

LibreOffice Calc

Calc is the spreadsheet component of the LibreOffice software.

Calc can be strongly compered to the popular spreadsheet software, Microsoft excel. You can use this software to deal with data sets in an effecient manner.

The software is often used by people to manage their income and expenses.

LibreOffice Calc Running on RaspbianLibreOffice Calc Running on Raspbian

If you would like to open the LibreOffice Calc software from the terminal you can try using the command below.

libreoffice --calc [FILENAME]

You can optionally specify a file to open by typing it in after the --calc part of the command.

LibreOffice Impress

Impress is a software package designed to help you create presentations.

The Impress software is LibreOffice's alterantive to Microsoft Powerpoint. Using this software you can create presentations with relative ease.

LibreOffice Impress Running on RaspbianLibreOffice Impress Running on Raspbian

If for some reason you need to launch the LibreOffice Impress software from command line you can utilize the following command.

libreoffice --impress [FILENAME]

Lastly if you want to use this command to open a presentation you can specify the file name after --impress.

At this stage you should now have successfully installed the LibreOffice software suite.

If you have had trouble with installing the LibreOffice software or have trouble finding it feel free to drop a comment in the section below.


via Pi My Life Up https://pimylifeup.com

Τετάρτη 8 Ιανουαρίου 2020

Από την ελληνίδα μάνα raver στη μητέρα startuper

Η πρώτη αναζητούσε κάποτε τον κανακάρη της σε αυτοσχέδιες πίστες ολονύκτιας διασκέδασης στα Οινόφυτα. Η δεύτερη εκφράζει με τον πλέον χαρακτηριστικό τρόπο το κύμα της νέας επιχειρηματικότητας που βρίσκεται παντού: από τα γραφειάκια του κέντρου της Αθήνας μέχρι τα εργαστήρια των Πανεπιστημίων

The post Από την ελληνίδα μάνα raver στη μητέρα startuper appeared first on Protagon.gr.


via ΘΕΜΑΤΑ | Protagon https://www.protagon.gr

Κυριακή 29 Δεκεμβρίου 2019

How much of a genius-level move was using binary space partitioning in Doom?

Cutting edge at the time, we swear.
Enlarge /

Cutting edge at the time, we swear.

In 1993, id Software released the first-person shooter Doom, which quickly became a phenomenon. The game is now considered one of the most influential games of all time.

A decade after Doom's release, in 2003, journalist David Kushner published a book about id Software called Masters of Doom, which has since become the canonical account of Doom's creation. I read Masters of Doom a few years ago and don't remember much of it now, but there was one story in the book about lead programmer John Carmack that has stuck with me. This is a loose gloss of the story (see below for the full details), but essentially, early in the development of Doom, Carmack realized that the 3D renderer he had written for the game slowed to a crawl when trying to render certain levels. This was unacceptable, because Doom was supposed to be action-packed and frenetic. So Carmack, realizing the problem with his renderer was fundamental enough that he would need to find a better rendering algorithm, starting reading research papers. He eventually implemented a technique called "binary space partitioning," never before used in a video game, that dramatically sped up the Doom engine.

That story about Carmack applying cutting-edge academic research to video games has always impressed me. It is my explanation for why Carmack has become such a legendary figure. He deserves to be known as the archetypal genius video game programmer for all sorts of reasons, but this episode with the academic papers and the binary space partitioning is the justification I think of first.

Obviously, the story is impressive because "binary space partitioning" sounds like it would be a difficult thing to just read about and implement yourself. I've long assumed that what Carmack did was a clever intellectual leap, but because I've never understood what binary space partitioning is or how novel a technique it was when Carmack decided to use it, I've never known for sure. On a spectrum from Homer Simpson to Albert Einstein, how much of a genius-level move was it really for Carmack to add binary space partitioning to Doom?

I've also wondered where binary space partitioning first came from and how the idea found its way to Carmack. So this post is about John Carmack and Doom, but it is also about the history of a data structure: the binary space partitioning tree (or BSP tree). It turns out that the BSP tree, rather interestingly, and like so many things in computer science, has its origins in research conducted for the military.

That's right: E1M1, the first level of Doom, was brought to you by the US Air Force.

The VSD problem

The BSP tree is a solution to one of the thorniest problems in computer graphics. In order to render a three-dimensional scene, a renderer has to figure out, given a particular viewpoint, what can be seen and what cannot be seen. This is not especially challenging if you have lots of time, but a respectable real-time game engine needs to figure out what can be seen and what cannot be seen at least 30 times a second.

This problem is sometimes called the problem of visible surface determination. Michael Abrash, a programmer who worked with Carmack on Quake (id Software's follow-up to Doom), wrote about the VSD problem in his famous Graphics Programming Black Book:

I want to talk about what is, in my opinion, the toughest 3-D problem of all: visible surface determination (drawing the proper surface at each pixel), and its close relative, culling (discarding non-visible polygons as quickly as possible, a way of accelerating visible surface determination). In the interests of brevity, I'll use the abbreviation VSD to mean both visible surface determination and culling from now on.

Why do I think VSD is the toughest 3-D challenge? Although rasterization issues such as texture mapping are fascinating and important, they are tasks of relatively finite scope, and are being moved into hardware as 3-D accelerators appear; also, they only scale with increases in screen resolution, which are relatively modest.

In contrast, VSD is an open-ended problem, and there are dozens of approaches currently in use. Even more significantly, the performance of VSD, done in an unsophisticated fashion, scales directly with scene complexity, which tends to increase as a square or cube function, so this very rapidly becomes the limiting factor in rendering realistic worlds.

Abrash was writing about the difficulty of the VSD problem in the late '90s, years after Doom had proved that regular people wanted to be able to play graphically intensive games on their home computers. In the early '90s, when id Software first began publishing games, the games had to be programmed to run efficiently on computers not designed to run them, computers meant for word processing, spreadsheet applications, and little else. To make this work, especially for the few 3D games that id Software published before Doom, id Software had to be creative. In these games, the design of all the levels was constrained in such a way that the VSD problem was easier to solve.

For example, in Wolfenstein 3D, the game id Software released just prior toDoom, every level is made from walls that are axis-aligned. In other words, in the Wolfenstein universe, you can have north-south walls or west-east walls, but nothing else. Walls can also only be placed at fixed intervals on a grid—all hallways are either one grid square wide, or two grid squares wide, etc., but never 2.5 grid squares wide. Though this meant that the id Software team could only design levels that all looked somewhat the same, it made Carmack's job of writing a renderer for Wolfenstein much simpler.

The

Wolfenstein

renderer solved the VSD problem by "marching" rays into the virtual world from the screen. Usually a renderer that uses rays is a "raycasting" renderer—these renderers are often slow, because solving the VSD problem in a raycaster involves finding the first intersection between a ray and something in your world, which in the general case requires lots of number crunching. But in

Wolfenstein

, because all the walls are aligned with the grid, the only location a ray can possibly intersect a wall is at the grid lines. So all the renderer needs to do is check each of those intersection points. If the renderer starts by checking the intersection point nearest to the player's viewpoint, then checks the next nearest, and so on, and stops when it encounters the first wall, the VSD problem has been solved in an almost trivial way. A ray is just marched forward from each pixel until it hits something, which works because the marching is so cheap in terms of CPU cycles. And actually, since all walls are the same height, it is only necessary to march a single ray for every

column

of pixels.

This rendering shortcut made Wolfenstein fast enough to run on underpowered home PCs in the era before dedicated graphics cards. But this approach would not work for Doom, since the id team had decided that their new game would feature novel things like diagonal walls, stairs, and ceilings of different heights. Ray marching was no longer viable, so Carmack wrote a different kind of renderer. Whereas the Wolfenstein renderer, with its ray for every column of pixels, is an "image-first" renderer, the Doom renderer is an "object-first" renderer. This means that rather than iterating through the pixels on screen and figuring out what color they should be, the Doom renderer iterates through the objects in a scene and projects each onto the screen in turn.

In an object-first renderer, one easy way to solve the VSD problem is to use a z-buffer. Each time you project an object onto the screen, for each pixel you want to draw to, you do a check. If the part of the object you want to draw is closer to the player than what was already drawn to the pixel, then you can overwrite what is there. Otherwise you have to leave the pixel as is. This approach is simple, but a z-buffer requires a lot of memory, and the renderer may still expend a lot of CPU cycles projecting level geometry that is never going to be seen by the player.

In the early 1990s, there was an additional drawback to the z-buffer approach: On IBM-compatible PCs, which used a video adapter system called VGA, writing to the output frame buffer was an expensive operation. So time spent drawing pixels that would only get overwritten later tanked the performance of your renderer.

Since writing to the frame buffer was so expensive, the ideal renderer was one that started by drawing the objects closest to the player, then the objects just beyond those objects, and so on, until every pixel on screen had been written to. At that point the renderer would know to stop, saving all the time it might have spent considering far-away objects that the player cannot see. But ordering the objects in a scene this way, from closest to farthest, is tantamount to solving the VSD problem. Once again, the question is: What can be seen by the player?

VIDEO

Initially, Carmack tried to solve this problem by relying on the layout of Doom's levels. His renderer started by drawing the walls of the room currently occupied by the player, then flooded out into neighboring rooms to draw the walls in those rooms that could be seen from the current room. Provided that every room was convex, this solved the VSD issue. Rooms that were not convex could be split into convex "sectors." You can see how this rendering technique might have looked if run at extra-slow speed in the video above, where YouTuber Bisqwit demonstrates a renderer of his own that works according to the same general algorithm. This algorithm was successfully used in Duke Nukem 3D, released three years after Doom, when CPUs were more powerful. But, in 1993, running on the hardware then available, the Doom renderer that used this algorithm struggled with complicated levels—particularly when sectors were nested inside of each other, which was the only way to create something like a circular pit of stairs. A circular pit of stairs led to lots of repeated recursive descents into a sector that had already been drawn, strangling the game engine's speed.

Around the time that the id team realized that the Doom game engine might be too slow, id Software was asked to port Wolfenstein 3D to the Super Nintendo. The Super Nintendo was even less powerful than the IBM-compatible PCs of the day, and it turned out that the ray-marching Wolfenstein renderer, simple as it was, didn't run fast enough on the Super Nintendo hardware. So Carmack began looking for a better algorithm. It was actually for the Super Nintendo port of Wolfenstein that Carmack first researched and implemented binary space partitioning. In Wolfenstein, this was relatively straightforward because all the walls were axis-aligned; in Doom, it would be more complex. But Carmack realized that BSP trees would solve Doom's speed problems too.


via Ars Technica https://arstechnica.com

Δευτέρα 16 Δεκεμβρίου 2019

Hey, Ubuntu? You Need a Better Image Viewer…

I think that Ubuntu needs a better default image viewer — and in this post I'm going to try and explain why!

Eye of GNOME is no where near as features as the image viewers on other platforms, including Chrome OS!

Now, don't get me wrong: 'Eye of GNOME' (which is often referred to by the package name of 'eog') does its job well. It lets you view images stored on your computer without any fuss.

But therein lies the rub; eog can't do much more than that. The app is simply no where near as featured as the default image viewers being shipped on other platforms, including Android, and even Chrome OS!

It's for this reason that I made changing the image viewer a step in my list of things to do after installing Ubuntu 19.10.

The Job of an Image Viewer

Admittedly it's been a long time since I last dove in to the world of open source image viewers (props for anyone who remembers Viewnior, an app I blogged endlessly about circa 2010. Here's hoping it gets a GTK3 port one day).

Yet, after every Ubuntu install I still do the exact same thing: make Shotwell the default image viewer for all supported image formats, including .jpeg and .png.

Why? Because Shotwell (as an image viewer) has a tonne of features that I use often, and it puts them in a really accessible place.

Now, you might be sat there thinking that I simply expect more from an image viewer than a regular user does.

But I'd disagree.

Features found across platforms

The default image viewing apps on both Windows and macOS let folks do far more with an image than simply view it. They include options to resize and crop, add text and callouts, and even perform some basic image enhancement.

Preview in macOS 10.12.6 with markup enabled

Folks switching to Linux from those systems may expect a comparable set of features in the native image viewer, only to find eog lacking.

If Ubuntu users would appreciate having some of those capabilities in easy reach too, and since Shotwell provides them, ought it be default instead?

Modern Expectations?

Now GNOME developers would, one imagines, reason that, as an image viewer, EOG should focus on viewing images and leave image editing to image editors, organisation to photo managers, and so on.

But while that explanation is fairly reasonable I do feel it overlooks the core reality of why most people use an image viewer today.

And spoiler: it isn't just to gawp at photos!

Viewing images is step 1, anticipate step 2

Thanks to smartphones, social networks, and ephemeral messaging services we send and receive more images than ever before. From gifs and selfies, to screenshots and wallpapers.

And, like many, I tend to view an image as the first step in a longer chain, usually to check that the photo in question is the one I'm looking to share or send or post or whatever else I want to do with it.

As part of that flow I usually make some basic edits, like cropping and resizing /converting the image to a lossy format.

Shotwell caters to all of that, within the same app, and in the same window. I don't need to load my image in an external app to make edits (then save the image, then open the image in the imagine viewer again to check it's the edited copy).

On screen controls

Having essential editing features available in an image viewer saves me time. Do they need to be on screen all the time (like they are in Shotwell)? Probably not.

Which brings me back to eog.

Now, I'm not advocating that eog transition to a full-fledged photo management app, but I do think that some thought should be given towards modern expectations and needs.

For instance, when I open an image eog I get four on-screen button: prev/next image and rotate left/rotate right:

Unless there's been a sudden uptick in the sale of digital cameras from the 1990s, why does rotating deserve omnipresent controls on every image?

I rarely need to rotate an image, certainly no where near enough to need on-screen controls plastered over every photo I view.

Eye of GNOME also lacks a couple of basic image editing features that the Shotwell image viewer natively provides, like image cropping and ratio resizing.

That said, Shotwell isn't flawless either. It has its flaws, as this chart shows:

Feature Eye of GNOME Shotwell (Image Viewer)
Play animated .gifs
Zoom
Resize image
Image cropping
Image rotation
Format conversation
Adjust image quality
Editing tools
Set image as wallpaper
Slideshow option
Show EXIF/info
Show transparent images

Tl;dr

We all use images way more than we used to. Ubuntu should ship with a modern image viewer, like Shotwell, to anticipate and cater to those needs.

What's your take? Let me know in the comments


via OMG! Ubuntu! https://ift.tt/2hvL2Dj

11 Best Cheap Laptops We Actually Like Using ($300 - $800)


If your budget is tight and you want the most bang for your buck, or you just want to keep something out of the landfill, the used laptop market it worth considering. I'm not going to link to or endorse any specific vendors, but I've had great luck buying used laptops on eBay from all sort of sellers (both pro and regular people).

To score the best deal make sure you know the market. Do some research first to figure out a machine that suits your needs. The easiest to come by, and therefore (usually) the best deals tend to be on more boring, business-oriented models. I happen to like ThinkPads, which tend to used by and then dumped all at once by large corporations, which means there's lots to choose from and they're cheap.

Aim for These Specs: Try to get a laptop with at least a 8th-generation Intel Core i3 processor, 8 GB of RAM, 128 GB of storage (preferably SSD or a solid-state drive), and at least a 13-inch display that's close to HD.

Finding Laptops on eBay: Once you know what you want, search for it on eBay. Scroll down and check the option to only show "Sold listings." Now take the 10 most recent sales, add up the prices and divide by 10. That's the average price, don't pay more than that. Keep the lowest price in mind, that's the great deal price. Now, uncheck the sold listing option. See what's between the lowest price and that average price. Those are the deals you can consider. I suggest watching a few. Don't bid, or participate at all. Just watch them until end, see how high the auctions ended up going.

Once you have a feel for the market, and what you should be paying, you'll know when you've found a deal. When you find it, wait. Don't bid until the last few minutes of the auction. You don't want other bidders to have a chance to react. Remember that if you miss out on something it's not the end of the world. There's always something new being listed on eBay.


via Wired Top Stories https://ift.tt/2uc60ci

I created my own deepfake—it took two weeks and cost $552


Deepfake technology uses deep neural networks to convincingly replace one face with another in a video. The technology has obvious potential for abuse and is becoming ever more widely accessible. Many good articles have been written about the important social and political implications of this trend.

This isn't one of those articles. Instead, in classic Ars Technica fashion, I'm going to take a close look at the technology itself: how does deepfake software work? How hard is it to use—and how good are the results?

I thought the best way to answer these questions would be to create a deepfake of my own. My Ars overlords gave me a few days to play around with deepfake software and a $1,000 cloud computing budget. A couple of weeks later, I have my result, which you can see above. I started with a video of Mark Zuckerberg testifying before Congress and replaced his face with that of Lieutenant Commander Data (Brent Spiner) from Star Trek: The Next Generation. Total spent: $552.

The video isn't perfect. It doesn't quite capture the full details of Data's face, and if you look closely you can see some artifacts around the edges.

Still, what's remarkable is that a neophyte like me can create fairly convincing video so quickly and for so little money. And there's every reason to think deepfake technology will continue to get better, faster, and cheaper in the coming years.

In this article I'll take you with me on my deepfake journey. I'll explain each step required to create a deepfake video. Along the way, I'll explain how the underlying technology works and explore some of its limitations.

Deepfakes need a lot of computing power and data

We call them deepfakes because they use deep neural networks. Over the last decade, computer scientists have discovered that neural networks become more and more powerful as you add additional layers of neurons (see the first installment of this series for a general introduction to neural networks). But to unlock the full power of these deeper networks, you need a lot of data and a whole lot of computing power.

That's certainly true of deepfakes. For this project, I rented a virtual machine with four beefy graphics cards. Even with all that horsepower, it took almost a week to train my deepfake model.

I also needed a heap of images of both Mark Zuckerberg and Mr. Data. My final video above is only 38 seconds long, but I needed to gather a lot more footage—of both Zuckberg and Data—for training.

To do this, I downloaded a bunch of videos containing their faces: 14 videos with clips from Star Trek: The Next Generation and nine videos featuring Mark Zuckerberg. My Zuckerberg videos included formal speeches, a couple of television interviews, and even footage of Zuckerberg smoking meat in his backyard.

I loaded all of these clips into iMovie and deleted sections that didn't contain Zuckerberg or Data's face. I also cut down longer sequences. Deepfake software doesn't just need a huge number of images, but it needs a huge number of different images. It needs to see a face from different angles, with different expressions, and in different lighting conditions. An hour-long video of Mark Zuckerberg giving a speech may not provide much more value than a five-minute segment of the same speech, because it just shows the same angles, lighting conditions, and expressions over and over again. So I trimmed several hours of footage down to 9 minutes of Data and 7 minutes of Zuckerberg.


via Ars Technica https://arstechnica.com

Δευτέρα 12 Φεβρουαρίου 2018

AGRIPHARM FutureSoftware | Galaxy ERP

Κάντε κλικ εδώ για DEMO: http://ift.tt/2CiMEGs AGRIPHARM της Future Software Ειδική λύση ηλεκτρονικής καταγραφής Φυτοπροστατευτικών Galaxy ERP
via SingularLogicCo https://www.youtube.com/channel/UCj73SHAokiSmGdVbzREPuBw

Τρίτη 6 Φεβρουαρίου 2018

Έξυπνες συμβουλές στο πλαίσιο της Ημέρας Ασφαλούς Διαδικτύου (SID)

Με την αυξανόμενη εξάρτησή μας από τους λογαριασμούς στο Διαδίκτυο, η Kaspersky Lab διαπίστωσε ότι οι άνθρωποι αντιμετωπίζουν όλο και περισσότερο ένα δίλημμα – πώς να επιλέγουν τους κωδικούς πρόσβασής τους.

Μερικοί καταλήγουν να χρησιμοποιούν ισχυρούς και διαφορετικούς κωδικούς πρόσβασης για κάθε λογαριασμό, έτσι ώστε να μην μπορούν να παραβιαστούν ή να τους εκμεταλλευτούν εγκληματίες, αλλά διατρέχουν τον κίνδυνο να ξεχνούν τους κωδικούς αυτούς με το πέρασμα του χρόνου. Άλλοι επιλέγουν κωδικούς πρόσβασης που μπορούν να απομνημονεύσουν εύκολα διευκολύνοντας τη ζωή τους, διατρέχοντας όμως τον κίνδυνο οι κωδικοί αυτοί να βρεθούν το ίδιο εύκολα στα χέρια ψηφιακών εγκληματιών.

Έτσι, φέτος, για την Ημέρα Ασφαλούς Διαδικτύου (SID) αφιερώστε ένα δευτερόλεπτο για να σκεφτείτε τους κωδικούς πρόσβασης που χρησιμοποιείτε για να διατηρήσετε ασφαλή τα πλέον προσωπικά σας δεδομένα.

Εάν δεν είστε σίγουροι ότι ο κωδικός πρόσβασής σας είναι ασφαλής, μπορείτε να ρίξετε μια ματιά στις παρακάτω συμβουλές του David Emm, Principal Security Researcher της Kaspersky Lab.

1. Ο κάθε κωδικός πρόσβασης σας πρέπει να είναι τουλάχιστον 15 χαρακτήρων – αλλά όσο περισσότεροι χαρακτήρες τόσο το καλύτερο.

2. Φροντίστε ώστε οι άλλοι να μην μπορούν να τους μαντέψουν εύκολα. Υπάρχει μια καλή πιθανότητα να μπορούν να βρουν προσωπικές σας πληροφορίες, όπως η ημερομηνία γέννησής σας, ο τόπος γέννησής σας, το όνομα του συνεργάτη σας κ.λπ. – ίσως ακόμη και στον «τοίχο» σας στο Facebook.

3. Μην χρησιμοποιείτε πραγματικές λέξεις. Είναι ανοιχτές σε «επιθέσεις λεξικού», όπου κάποιος χρησιμοποιεί ένα πρόγραμμα για να δοκιμάσει γρήγορα μια τεράστια λίστα πιθανών λέξεων μέχρι να βρει μία που να ταιριάζει με τον κωδικό πρόσβασής σας.

4. Συνδυάστε γράμματα (συμπεριλαμβανομένων κεφαλαίων), αριθμούς και σύμβολα.

5. Μην τους "ανακυκλώνετε", π.χ. 'Kostas1', 'Kostas2', 'Kostas3', κλπ.

6. Χρησιμοποιήστε έναν διαφορετικό κωδικό πρόσβασης για κάθε λογαριασμό για να αποτρέψετε την ευπάθεια όλων των λογαριασμών σας. Αν δυσκολεύεστε να θυμηθείτε μοναδικούς πολύπλοκους κωδικούς πρόσβασης, χρησιμοποιήστε έναν διαχειριστή κωδικών για να σας βοηθήσει να δημιουργήσετε, να αποθηκεύσετε και να θυμηθείτε τους κωδικούς σας με ασφάλεια.

7. Εάν υποψιάζεστε ότι ο κωδικός πρόσβασής σας έχει παραβιαστεί, αλλάξτε τον αμέσως!


via pestaola.gr http://www.pestaola.gr

Τετάρτη 24 Ιανουαρίου 2018

Πέμπτη 30 Ιουνίου 2016

Στις 2 Αυγούστου το Windows 10 anniversary update

windows 10 update

H Microsoft ανακοίνωσε ότι θα διαθέσει στο κοινό το Windows 10 anniversary update στις 2 Αυγούστου σε όλες τις συσκευές. 

Μέχρι στιγμής, οι εγκαταστάσεις των Windows 10 φτάνουν τις 350 εκατομμύρια μονάδες, ενώ το anniversary update θα είναι διαθέσιμο ταυτόχρονα για τα PC, το Xbox One και τα smartphones. Οι αλλαγές που περιλαμβάνει το update των Windows 10 είναι η καλύτερη ενσωμάτωση της Cortana σε όλες τις εκδοχές τους, η βελτίωση και προσθήκη περισσότερων επεκτάσεων για τον Edge browser, οι περισσότερες δυνατότητες για συστήματα που χρησιμοποιούν stylus, καθώς και η μεγαλύτερη προσοχή που έχει δοθεί στην κατηγορία του gaming στο Windows Store.

To Start Menu θα έχει επανασχεδιασμένο layout, ένα πιο σκούρο theme και ένα υποσύστημα Linux για να μπορεί κανείς να τρέχει ορισμένες Linux εφαρμογές στα Windows. Στο Xbox One θα μπορεί κανείς να ακούσει μουσική στο παρασκήνιο, να έχει πρόσβαση σε Windows apps και να εγκαταστήσει την Cortana. Βελτιωμένη αναμένεται να είναι και η προστασία μέσα από το Windows Defender για τους υπολογιστές.

Όλοι οι χρήστες Windows 10 συστημάτων θα μπορούν να λάβουν χωρίς χρέωση το Windows 10 anniversary update, ενώ το λειτουργικό σύστημα της Microsoft παραμένει δωρεάν διαθέσιμο ως upgrade παλαιότερων συστημάτων μέχρι και τις 29 Ιουλίου.


via pestaola.gr http://www.pestaola.gr

Τρίτη 14 Ιουνίου 2016

Τι νέο φέρνει το iOS 10 της Apple – Αναβαθμισμένος ο ρόλος της Siri

iphone-6

H Apple, στο πλαίσιο του WWDC 2016, ανακοίνωσε το νέο mobile λειτουργικό της σύστημα OS 10, με αρκετές ενδιαφέρουσες προσθήκες. 

Ακολουθώντας τη λογική της ενίσχυσης της παρουσίας της Siri στο οικοσύστημα της Apple, η Siri έχει πλέον το δικό της Software Development Kit, για να μπορούν οι developers να τη βάζουν στις εφαρμογές τους. Το iMessage είναι και αυτό βελτιωμένο με πολλές δυνατότητες, όπως είναι η δυνατότητα να παίζει κανείς βίντεο μέσα στις συνομιλίες και όχι μόνο. Το Apple Music είναι ακόμα πιο βελτιωμένο και ταιριάζει στα ιδιαίτερα γούστα του κατόχου μιας iOS 10 συσκευής.

Επανασχεδιασμένες είναι οι εφαρμογές για τους χάρτες και τις φωτογραφίες, ενώ η Siri βοηθά και στην πληκτρολόγηση. Το επανασχεδιασμένο Apple News χωρίζει τις ειδήσεις σε θεματικές ενότητες, ενώ προσφέρει και ειδοποιήσεις για ειδήσεις που συμβαίνουν εκείνη τη στιγμή. Οι δυνατότητες σύνδεσης με το έξυπνο σπίτι ελέγχονται από το Home app, ενώ ταυτόχρονα η λειτουργία της εφαρμογής Phone επιτρέπει την αποδοχή των εισερχόμενων κλήσεων VoIP σε ένα σημείο.

To iOS 10 επιτρέπει την αφαίρεση προεγκατεστημένων εφαρμογών της Apple, ενώ αλλαγμένη είναι η αρχική οθόνη κλειδώματος, η οποία έχει νέο τρόπο ενεργοποιήσεις επιμέρους λειτουργιών όπως είναι εκείνη της κάμερας. Το νέο iOS 10 θα είναι διαθέσιμο σε iPhone 5, 5c, 5s, iPhone SE, iPhone 6 / Plus, iPhone 6s / Plus, iPad 4th gen, iPad Air, iPad Air 2, iPad Pro, iPad mini 2, iPad mini 3, iPad mini 4 και iPod touch 6th gen.


via pestaola.gr http://www.pestaola.gr

Παρασκευή 6 Μαΐου 2016

Προσνήωση πυραύλου της SpaceX στο σκοτάδι

spacex falcon 9 returning

Οι εξελίξεις στη διαστημική τεχνολογία συνεχίζουν να εντυπωσιάζουν, καθώς η SpaceX κατάφερε να προσνηώσει έναν Falcon 9 σε θαλάσσια πλατφόρμα στο σκοτάδι. 

Ο πύραυλος της SpaceX ταξίδευε με ταχύτητα έξι φορές μεγαλύτερη από την ταχύτητα του ήχου και επέστρεψε από την μεταφορά μεγάλου φορτίου στο διάστημα. Η θαλάσσια πλατφόρμα της SpaceX ήταν σε κατάλληλη θέση στα σκοτεινά νερά και περίμενε την επιστροφή του πυραύλου, σε μια αποστολή που στο παρελθόν θα αποτελούσε σενάριο επιστημονικής φαντασίας.

Ο πύραυλος Falcon 9 της SpaceX μετέφερε με ασφάλεια έναν ιαπωνικό τηλεπικοινωνιακό δορυφόρο σε τροχιά και τον έθεσε σε λειτουργία με πλήρη επιτυχία. Το δύσκολο κομμάτι ήταν να καταφέρει η εταιρεία να τον επαναφέρει στη Γη και να τον τοποθετήσει με ασφάλεια πάνω σε μία κινούμενη πλατφόρμα στα σκοτεινά νερά. Όλα στέφθηκαν με επιτυχία και τόσο ο Elon Musk, όσο και όλοι οι εργαζόμενοι στην SpaceX δικαιούνται να πανηγυρίζουν.

Αυτή δεν είναι η πρώτη επιτυχημένη επαναφορά πυραύλου για τη SpaceX, αλλά αυτή έγινε σε πολύ δύσκολες συνθήκες λόγω του σκοταδιού. Ο άλλος πύραυλος της SpaceX που είχε προσγειωθεί με επιτυχία αναμένεται σύντομα να ξαναχρησιμοποιηθεί σε νέα αποστολή. Το γεγονός αυτό εξοικονομεί πολύ μεγάλα ποσά χρημάτων στη SpaceX και μειώνει σε μεγάλο βαθμό το κόστος της μεταφοράς φορτίων στο διάστημα.


via pestaola http://www.pestaola.gr